Helm
用于在 Kubernetes 上部署 vLLM 的 Helm Chart
Helm 是 Kubernetes 的包管理器,可帮助自动化在 Kubernetes 上部署 vLLM 应用程序。通过 Helm,您可以使用不同的配置将相同的框架架构部署到多个命名空间,只需覆盖变量值即可。
本指南将引导您完成使用 Helm 部署 vLLM 的过程,包括必要的先决条件、Helm 安装步骤以及架构和 values 文件的文档说明。
先决条件
在开始之前,请确保您具备以下条件:
- 一个正在运行的 Kubernetes 集群
- NVIDIA Kubernetes 设备插件(
k8s-device-plugin):可在 https://github.com/NVIDIA/k8s-device-plugin 获取 - 集群中可用的 GPU 资源
- (可选)一个 S3 存储桶或其他存储,用于存放模型权重(如果使用自动模型下载功能)
安装 Chart
使用 release 名称 test-vllm 安装 chart:
helm upgrade --install --create-namespace \
  --namespace=ns-vllm test-vllm . \
  -f values.yaml \
  --set secrets.s3endpoint=$ACCESS_POINT \
  --set secrets.s3bucketname=$BUCKET \
  --set secrets.s3accesskeyid=$ACCESS_KEY \
  --set secrets.s3accesskey=$SECRET_KEY
卸载 Chart
卸载 test-vllm 部署:
该命令将移除与该 chart 关联的所有 Kubernetes 组件,包括持久卷,并删除该 release。
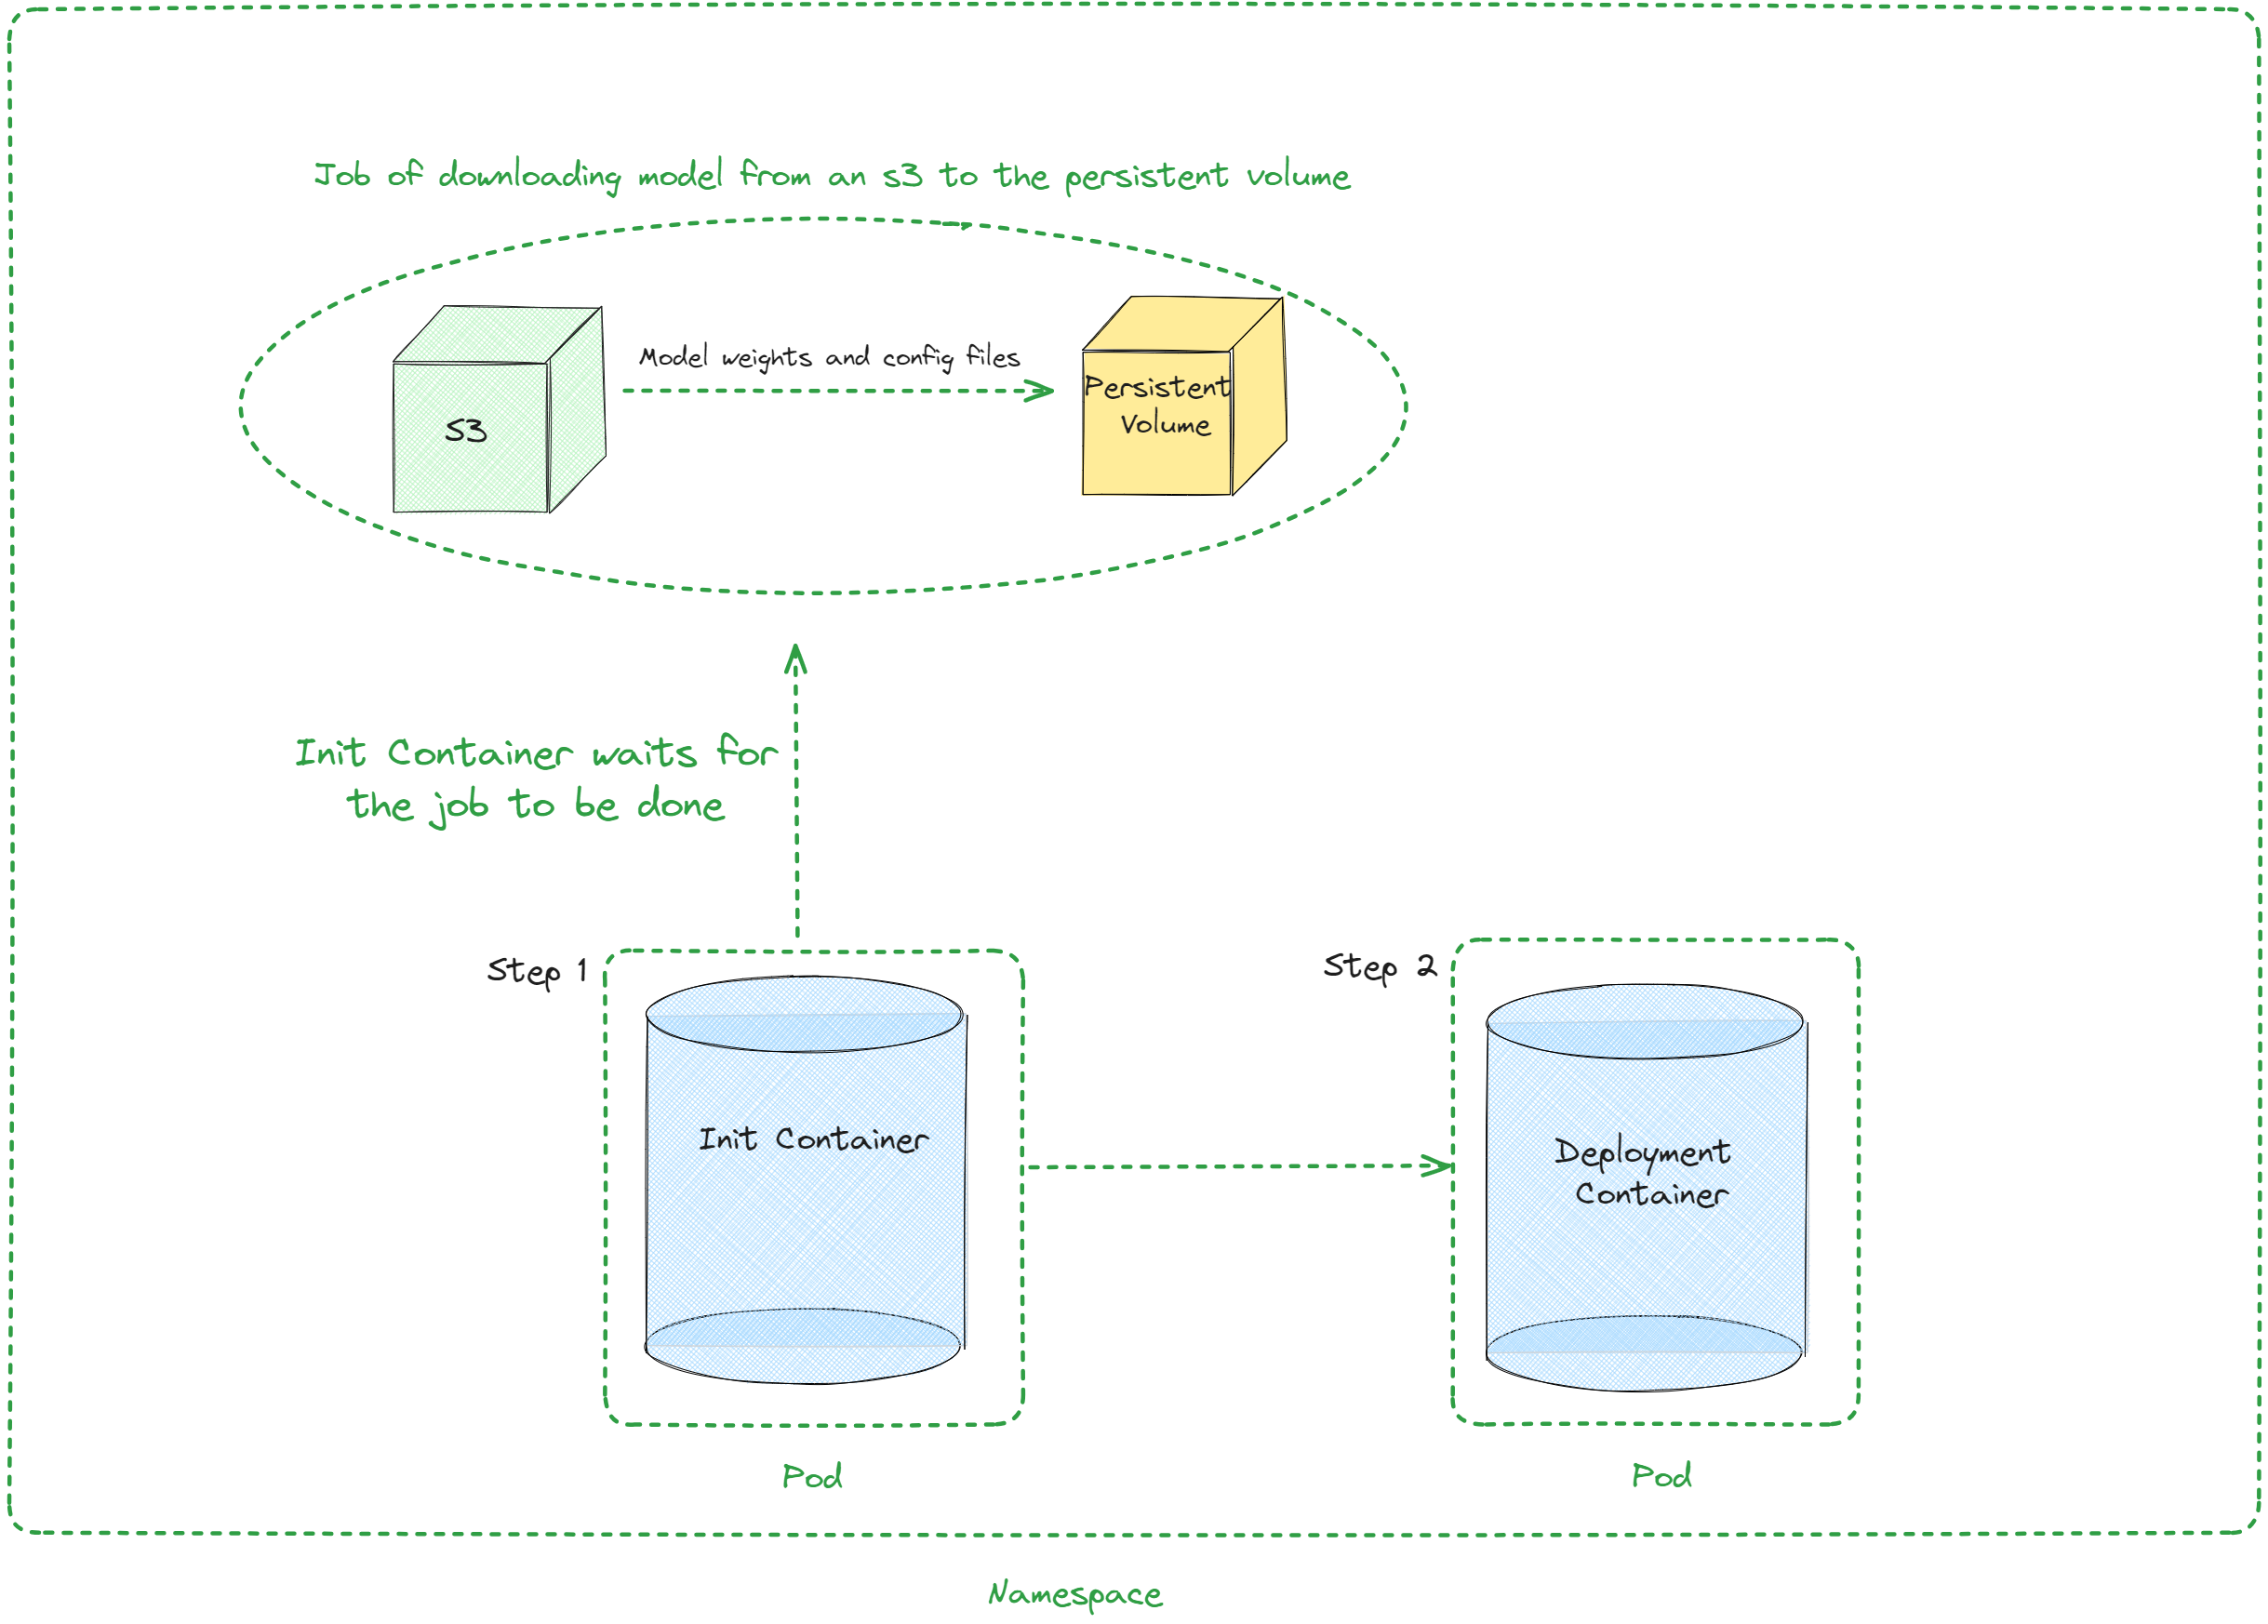
架构
Values
下表描述了 values.yaml 中 chart 的可配置参数:
| 键 | 类型 | 默认值 | 描述 |
|---|---|---|---|
| autoscaling | object | {"enabled":false,"maxReplicas":100,"minReplicas":1,"targetCPUUtilizationPercentage":80} | 自动扩缩容配置 |
| autoscaling.enabled | bool | false | 启用自动扩缩容 |
| autoscaling.maxReplicas | int | 100 | 最大副本数 |
| autoscaling.minReplicas | int | 1 | 最小副本数 |
| autoscaling.targetCPUUtilizationPercentage | int | 80 | 自动扩缩容的目标 CPU 利用率 |
| configs | object | {} | ConfigMap 配置 |
| containerPort | int | 8000 | 容器端口 |
| customObjects | list | [] | 自定义对象配置 |
| deploymentStrategy | object | {} | 部署策略配置 |
| externalConfigs | list | [] | 外部配置 |
| extraContainers | list | [] | 额外容器配置 |
| extraInit | object | {"modelDownload":{"enabled":true},"initContainers":[],"pvcStorage":"1Gi"} | Init 容器的额外配置 |
| extraInit.modelDownload | object | {"enabled":true} | 模型下载功能配置 |
| extraInit.modelDownload.enabled | bool | true | 启用自动模型下载任务和等待容器 |
| extraInit.modelDownload.image | object | {"repository":"amazon/aws-cli","tag":"2.6.4","pullPolicy":"IfNotPresent"} | 模型下载操作使用的镜像 |
| extraInit.modelDownload.waitContainer | object | {} | 等待容器配置(command、args、env) |
| extraInit.modelDownload.downloadJob | object | {} | 下载任务配置(command、args、env) |
| extraInit.initContainers | list | [] | 自定义 Init 容器(如果启用模型下载,则追加在模型下载之后) |
| extraInit.pvcStorage | string | "1Gi" | PVC 的存储容量 |
| extraInit.s3modelpath | string | "relative_s3_model_path/opt-125m" | (可选)S3 上模型的路径 |
| extraInit.awsEc2MetadataDisabled | bool | true | (可选)禁用 AWS EC2 元数据服务 |
| extraPorts | list | [] | 额外端口配置 |
| gpuModels | list | ["TYPE_GPU_USED"] | 使用的 GPU 类型 |
| image | object | {"command":["vllm","serve","/data/","--served-model-name","opt-125m","--host","0.0.0.0","--port","8000"],"repository":"vllm/vllm-openai","tag":"latest"} | 镜像配置 |
| image.command | list | ["vllm","serve","/data/","--served-model-name","opt-125m","--host","0.0.0.0","--port","8000"] | 容器启动命令 |
| image.repository | string | "vllm/vllm-openai" | 镜像仓库 |
| image.tag | string | "latest" | 镜像标签 |
| livenessProbe | object | {"failureThreshold":3,"httpGet":{"path":"/health","port":8000},"initialDelaySeconds":15,"periodSeconds":10} | 存活探针配置 |
| livenessProbe.failureThreshold | int | 3 | 连续失败多少次后,Kubernetes 认为容器不存活 |
| livenessProbe.httpGet | object | {"path":"/health","port":8000} | kubelet 向服务器发起的 HTTP 请求配置 |
| livenessProbe.httpGet.path | string | "/health" | 访问 HTTP 服务器的路径 |
| livenessProbe.httpGet.port | int | 8000 | 访问容器上服务器监听的端口名称或编号 |
| livenessProbe.initialDelaySeconds | int | 15 | 容器启动后延迟多少秒开始首次存活探针检测 |
| livenessProbe.periodSeconds | int | 10 | 存活探针的检测间隔(秒) |
| maxUnavailablePodDisruptionBudget | string | "" | 中断预算配置 |
| readinessProbe | object | {"failureThreshold":3,"httpGet":{"path":"/health","port":8000},"initialDelaySeconds":5,"periodSeconds":5} | 就绪探针配置 |
| readinessProbe.failureThreshold | int | 3 | 连续失败多少次后,Kubernetes 认为容器未就绪 |
| readinessProbe.httpGet | object | {"path":"/health","port":8000} | kubelet 向服务器发起的 HTTP 请求配置 |
| readinessProbe.httpGet.path | string | "/health" | 访问 HTTP 服务器的路径 |
| readinessProbe.httpGet.port | int | 8000 | 访问容器上服务器监听的端口名称或编号 |
| readinessProbe.initialDelaySeconds | int | 5 | 容器启动后延迟多少秒开始首次就绪探针检测 |
| readinessProbe.periodSeconds | int | 5 | 就绪探针的检测间隔(秒) |
| replicaCount | int | 1 | 副本数量 |
| resources | object | {"limits":{"cpu":4,"memory":"16Gi","nvidia.com/gpu":1},"requests":{"cpu":4,"memory":"16Gi","nvidia.com/gpu":1}} | 资源配置 |
| resources.limits."nvidia.com/gpu" | int | 1 | 使用的 GPU 数量 |
| resources.limits.cpu | int | 4 | CPU 数量 |
| resources.limits.memory | string | "16Gi" | CPU 内存配置 |
| resources.requests."nvidia.com/gpu" | int | 1 | 使用的 GPU 数量 |
| resources.requests.cpu | int | 4 | CPU 数量 |
| resources.requests.memory | string | "16Gi" | CPU 内存配置 |
| secrets | object | {} | 密钥配置 |
| serviceName | string | "" | 服务名称 |
| servicePort | int | 80 | 服务端口 |
| labels.environment | string | test | 环境名称 |
配置示例
使用 S3 模型下载(默认)
仅使用自定义 Init 容器
适用于 llm-d 等需要自定义 Sidecar 但不需要模型下载的场景: